
Share Connection eth0 on Kali

When I was still using Backtrack as pentest Operating System on my netbook, I need to configure everything about networking, include sharing connection over eth0 interface. I must type on the terminal to set up the interface, then set the IP and netmask, etc. After setting the interface connection, I also must to configure  iptables to forwarding the internet connection from the other interface into eth0, and the last step I must turn on forwarding rule. It's really fun, although need several step to do it. But, when I am using Kali Linux, I realise that the step which can I do on backtrack doesn't running on Kali Linux. After learn several option about networking on Kali, finally I can share connection over eth0 on Kali Linux.
Okay, the first assume that we must have connected internet (not using eth0). Next, when your connection are ready, you can right click on the networking icon, select Edit Connection.
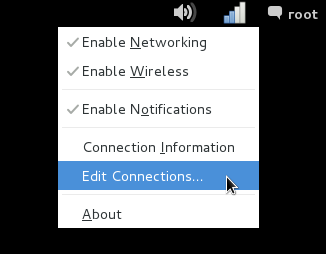
Edit Connection

When the window "Networking Connection" appear, click Wired tab, and select Wired Connection, then click Edit.
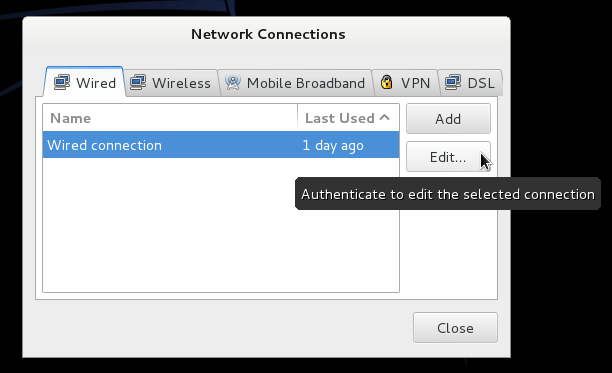
Network Connection

Configure Wired Connection on IPv4 tab, set the method is "Shared to the other computers", don't forget to checklist Connect automatically, see figure below. Save the configuration within click Save.
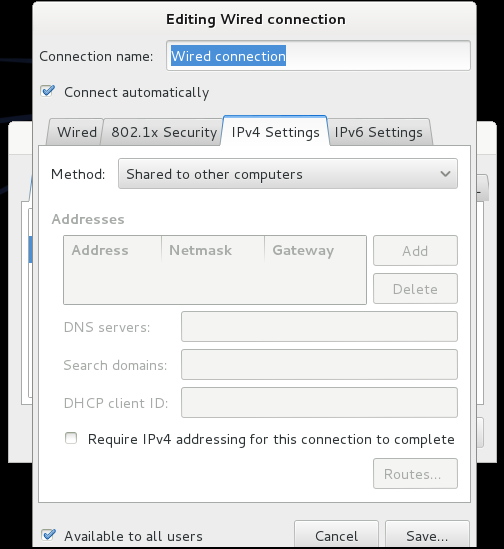
Wired Connection

Now, your computer are ready for sharing connection over eth0 interface on Kali Linux. You can share with plug-in the UTP cable on your computer and the other computer, and DHCP Server will give the IP Address automatically for the other computer which you have shared internet connection.
Comments

Anonymous said…
You have not include any iptables rules nor forwarding....
It is not much of use
h3rucutu said…
it's not needed
I have the "edit connections" option but when I click on that, no window is opened.
h3rucutu said…
@Li-Khriss/Tutoriales : what?? Try it again, when you clicked, the window must be appear

Popular posts from this blog

Bypassing Nokia Maps N9

Nokia N9 have maps application, both of Nokia Maps and Nokia Drive are related one to other. But the same problem with Nokia Drive on Nokia N9 also occur in Nokia Maps (see here ). Nokia Maps also need logged in Nokia Account before you can use Nokia Maps. So I think the same way with bypassing Nokia Account in Nokia Drive will be succeed too in Nokia Maps. The same step can be read on my previous post here , until preparing the configuration Nokia Drive download. Okay let's go! First, make sure you have installed Filebox and setting to show hidden files and show root filesystem. Open browser on your N9 and download Modified Nokia Maps Configuration here . Don't press clear when the download has finished, just tap Done. Go to Filebox, and navigate to /home/user/MyDocs/Downloads , you'll found Maps.conf there, copy and paste this file into /home/user/.config/Nokia . But I recommend you if there's existing Nokia Maps Configuration backup it into Maps.conf.bak the ...

Bypassing Nokia Drive N9

Nokia N9 contains maps application bundled by Nokia with offline maps, but to access Drive application you need to have Nokia Account and you must login in your N9. Before Nokia Account has been shutdown by Microsoft (see here ) there's no problem to using Nokia Maps on N9, but after 25th, April 2015 Nokia Account no longer can be accessed. So maybe you think that your N9 can't help you to assist when you driving or find place around the world. Nokia Account requirement Here, I'll show you to bypassing Nokia Account requirement to access Nokia Drive on N9 Harmattan. So you don't need to have Nokia Account logged on your N9 to access Nokia Drive. Below is the step by step to bypassing by modify Nokia Drive configuration on Harmattan. First, you'll need installed Filebox on your Harmattan N9 (see here  for installer and this  for installation). Open Filebox and make sure you have change settings to Show root filesystem and Show hidden files. Filebox Sett...

Iceweasel Flash Plugin on Kali

Iceweasel is the default web browser on Kali Linux, not longer Mozilla Firefox. But it's still based on Firefox Engine. When you first running your Kali Linux, there's not a flash player plugins which installed on Iceweasel. You can open Youtube to verify that. If you can playing any video there, maybe your Iceweasel has been installed flash player plugins. But, when you can't playing any video, you will need to install flash player plugins first. Okay, now go to the  https://get.adobe.com/flashplayer  for downloading the flash player plugins from Adobe with Iceweasel. When the page loaded, select tar.gz for the other Linux , then click Download. Downloading Flash Plugins Lets get into your terminal and go to the directory where the file has been downloaded. You can extract the tar.gz file with command below. root@h3:~# tar xvf install_flash_player_11_linux.i386.tar.gz Next, move the plugins (*.so) into the plugins lib of Icewasel. root@h3:~# mv libflashplaye...